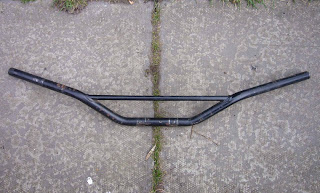
In the past, the first thing that I would normally have done to a new bike was swap the standard handlebars for a set of trials-type braced ones. These offer a more upright riding position and a wider stance, which is what I generally prefer.
I didn't do this to any of my Skorpions as they all have clip-ons, so changing them is quite involved and, generally, I find the standard riding position quite comfortable once adjusted to my satisfaction (the Sport model being the exception with its slightly more race-style riding position).
However, with everything else going on, I decided to change the handlebars too and see how I got on. If I found that I didn't like it, I would still have all the standard bits to change them back.
First up was to sort out the replacement handlebars. As the new bodywork I'm using is navy blue, I thought that some blue handlebars would be just the thing. A quick search located any number of ones which would have fitted the bill, but as luck would have it, before I bought any, and while looking for something else, I came across an old set of 7/8" braced 'bars in a box. Luckily they were painted rather than chromed and, although a bit pitted and scratched, they weren't actually bent. Why spend extra cash when I could, with a bit of work, refurbish something I already had?
A further rummage located a nearly full spray can of grey primer, and a trip to a hardware store got me a small 250ml can of Plastikote metallic blue enamel spray paint. I've used Plastikote before and like it. It's easy to work with and produces a decent enough finish from a can, just don't expect to win any awards with it.With the primer, paint and a handful of wet & dry paper I set to work.
After cleaning, and a rub down with some wet & dry paper to remove any flaky paint and dirt, the handlebars were sprayed with a couple of coats of primer, leaving about half an hour between coats. What I should have done was remember that I needed to drill a couple of holes in the handlebars to locate the pegs on the switchgear. Doh!
Two 5mm holes were duly drilled and the area around the holes was tidied up, then sprayed with some more primer. Everything was then left for 24 hours to allow it time to dry properly.
Before spraying on the paint, more wet & dry was used to remove any lumps and bumps and to key the surface. When spraying paint, it's best to add a couple of light coats rather than try and get it done in one go. Plastikote is touch dry in about 45 minutes, so another coat can be added at that point. If the paint looks to have bubbled or run, then you wait until that coat is dry and get out the wet & dry again and gently smooth it down.
I ended up using about five light coats in the end and the finish is better than I expected, tell the truth. If I planned on doing it properly I could have added a coat or two of laquer at this point, but as I didn't have any, I didn't bother.
Anyway, I now have one set of nice shiny metallic blue handlebars for next to no cost. You might prefer to just buy a new set and save yourself the hassle.
Anyway, I now have one set of nice shiny metallic blue handlebars for next to no cost. You might prefer to just buy a new set and save yourself the hassle.


No comments:
Post a Comment